- 1PS提示:因为图层已锁定,无法编辑图层的处理方法
- 2picacg苹果版怎么找不到|picacg ios版是不是下架了介绍
- 3Adobe Illustrator CS5 序列号大全
- 4ACDsee注册码免费分享(含ACDsee18、ACDsee10等版本)
- 5PDF浏览器能看3D文件吗?PDF浏览器看3D文件图文详细教程
- 6Potato(马铃薯聊天)怎么注册不了|Potato不能注册处理方法介绍
- 7Potato(土豆聊天)怎么换头像|Potato app更改头像方法介绍
- 8最新的Adobe Illustrator CS4序列号大全
- 9Intel i7-9700K性能跑分曝光:同代提升约12%
- 10qq邮件是否已读怎么看 QQ邮箱已经发出去的邮件怎么知道对方是否已经查看
- 11AMD推土机架构回顾:虽陨落却是Zen成功的垫脚石
- 12美国增加25%进口关税!PC硬件要大涨价
[摘要]这篇文章主要为大家详细介绍了HTML实现遮罩层的方法,Web页面中使用遮罩层,可防止重复操作,那么如何在HTML中使用遮罩层?感兴趣的小伙伴们可以参考一下Web页面中使用遮罩层,可防止重复操作,提示loading;也可以模拟弹出模态窗口。实现思路:一个p作为遮罩层,一个p显示loading动态GI...
这篇文章主要为大家详细介绍了HTML实现遮罩层的方法,Web页面中使用遮罩层,可防止重复操作,那么如何在HTML中使用遮罩层?感兴趣的小伙伴们可以参考一下Web页面中使用遮罩层,可防止重复操作,提示loading;也可以模拟弹出模态窗口。
实现思路:一个p作为遮罩层,一个p显示loading动态GIF图片。在下面的示例代码中,同时展示了如何在iframe子页面中调用显示和隐藏遮罩层。
示例代码:
index.html
XML/HTML Code复制内容到剪贴板
<!DOCTYPE html>
<html lang="zh-CN">
<head>
<meta charset="utf-8">
<meta http-equiv="X-UA-Commpatible" content="IE=edge">
<title>HTML遮罩层</title>
<link rel="stylesheet" href="css/index.css">
</head>
<body>
    <p class="header" id="header">
        <p class="title-outer">
            <span class="title">
                HTML遮罩层使用
            </span>
        </p>
    </p>
    <p class="body" id="body">
        <iframe id="iframeRight" name="iframeRight" width="100%" height="100%"
            scrolling="no" frameborder="0"
            style="border: 0px;margin: 0px; padding: 0px; width: 100%; height: 100%;overflow: hidden;"
            onload="rightIFrameLoad(this)" src="body.html"></iframe>
    </p>

    <!-- 遮罩层p -->
    <p id="overlay" class="overlay"></p>
    <!-- Loading提示 p -->
    <p id="loadingTip" class="loading-tip">
        <img src="images/loading.gif" />
    </p>

    <!-- 模拟模态窗口p -->
    <p class="modal" id="modalp"></p>

    <script type='text/javascript' src="js/jquery-1.10.2.js"></script>
    <script type="text/javascript" src="js/index.js"></script>
</body>
</html>
index.css
CSS Code复制内容到剪贴板
* {
    margin: 0;
    padding: 0;
}

html, body {
    width: 100%;
    height: 100%;
    font-size: 14px;
}

p.header {
    width: 100%;
    height: 100px;
    border-bottom: 1px dashed blue;
}

p.title-outer {
    position: relative;
    top: 50%;
    height: 30px;
}
span.title {
    text-align: left;
    position: relative;
    left: 3%;
    top: -50%;
    font-size: 22px;
}

p.body {
    width: 100%;
}
.overlay {
    position: absolute;
    top: 0px;
    left: 0px;
    z-index: 10001;
    display:none;
    filter:alpha(opacity=60);
    background-color: #777;
    opacity: 0.5;
    -moz-opacity: 0.5;
}
.loading-tip {
    z-index: 10002;
    position: fixed;
    display:none;
}
.loading-tip img {
    width:100px;
    height:100px;
}

.modal {
    position:absolute;
    width: 600px;
    height: 360px;
    border: 1px solid rgba(0, 0, 0, 0.2);
    box-shadow: 0px 3px 9px rgba(0, 0, 0, 0.5);
    display: none;
    z-index: 10003;
    border-radius: 6px;
}
index.js
JavaScript Code复制内容到剪贴板
function rightIFrameLoad(iframe) {
    var pHeight = getWindowInnerHeight() - $('#header').height() - 5;

    $('p.body').height(pHeight);
    console.log(pHeight);

}

// 浏览器兼容 取得浏览器可视区高度
function getWindowInnerHeight() {
    var winHeight = window.innerHeight
               (document.documentElement && document.documentElement.clientHeight)
               (document.body && document.body.clientHeight);
    return winHeight;

}

// 浏览器兼容 取得浏览器可视区宽度
function getWindowInnerWidth() {
    var winWidth = window.innerWidth
               (document.documentElement && document.documentElement.clientWidth)
               (document.body && document.body.clientWidth);
    return winWidth;

}

/**
 * 显示遮罩层
 */
function showOverlay() {
    // 遮罩层宽高分别为页面内容的宽高
    $('.overlay').css({'height':$(document).height(),'width':$(document).width()});
    $('.overlay').show();
}

/**
 * 显示Loading提示
 */
function showLoading() {
    // 先显示遮罩层
    showOverlay();
    // Loading提示窗口居中
    $("#loadingTip").css('top',
            (getWindowInnerHeight() - $("#loadingTip").height()) / 2 + 'px');
    $("#loadingTip").css('left',
            (getWindowInnerWidth() - $("#loadingTip").width()) / 2 + 'px');

    $("#loadingTip").show();
    $(document).scroll(function() {
        return false;
    });
}

/**
 * 隐藏Loading提示
 */
function hideLoading() {
    $('.overlay').hide();
    $("#loadingTip").hide();
    $(document).scroll(function() {
        return true;
    });
}

/**
 * 模拟弹出模态窗口p
 * @param innerHtml 模态窗口HTML内容
 */
function showModal(innerHtml) {
    // 取得显示模拟模态窗口用p
    var dialog = $('#modalp');

    // 设置内容
    dialog.html(innerHtml);

    // 模态窗口p窗口居中
    dialog.css({
        'top' : (getWindowInnerHeight() - dialog.height()) / 2 + 'px',
        'left' : (getWindowInnerWidth() - dialog.width()) / 2 + 'px'
    });

    // 窗口p圆角
    dialog.find('.modal-container').css('border-radius','6px');

    // 模态窗口关闭按钮事件
    dialog.find('.btn-close').click(function(){
        closeModal();
    });

    // 显示遮罩层
    showOverlay();

    // 显示遮罩层
    dialog.show();
}

/**
 * 模拟关闭模态窗口p
 */
function closeModal() {
    $('.overlay').hide();
    $('#modalp').hide();
    $('#modalp').html('');
}
body.html
XML/HTML Code复制内容到剪贴板
<!DOCTYPE html>
<html lang="zh-CN">
<head>
<meta charset="utf-8">
<meta http-equiv="X-UA-Commpatible" content="IE=edge">
<title>body 页面</title>
<style type="text/css">
* {
    margin: 0;
    padding: 0;
}

html, body {
    width: 100%;
    height: 100%;
}

.outer {
    width: 200px;
    height: 120px;
    position: relative;
    top: 50%;
    left: 50%;
}

.inner {
    width: 200px;
    height: 120px;
    position: relative;
    top: -50%;
    left: -50%;
}

.button {
    width: 200px;
    height: 40px;
    position: relative;
}

.button#btnShowLoading {
    top: 0;
}

.button#btnShowModal {
    top: 30%;
}

</style>
<script type="text/javascript">

    function showOverlay() {
        // 调用父窗口显示遮罩层和Loading提示
        window.top.window.showLoading();

        // 使用定时器模拟关闭Loading提示
        setTimeout(function() {
            window.top.window.hideLoading();
        }, 3000);

    }

    function showModal() {
        // 调用父窗口方法模拟弹出模态窗口
        window.top.showModal($('#modalContent').html());
    }

</script>
</head>
<body>
    <p class='outer'>
        <p class='inner'>
            <button id='btnShowLoading' class='button' onclick='showOverlay();'>点击弹出遮罩层</button>
            <button id='btnShowModal' class='button' onclick='showModal();'>点击弹出模态窗口</button>
        </p>
    </p>

    <!-- 模态窗口内容p,将本页面p内容设置到父窗口p上并模态显示 -->
    <p id='modalContent' style='display: none;'>
        <p class='modal-container' style='width: 100%;height: 100%;background-color: white;'>
            <p style='width: 100%;height: 49px;position: relative;left: 50%;top: 50%;'>
                <span style='font-size: 36px; width: 100%; text-align:center; display: inline-block; position:inherit; left: -50%;top: -50%;'>模态窗口1</span>
            </p>
            <button class='btn-close' style='width: 100px; height: 30px; position: absolute; right: 30px; bottom: 20px;'>关闭</button>
        </p>
    </p>
    <script type='text/javascript' src="js/jquery-1.10.2.js"></script>
</body>
</html>
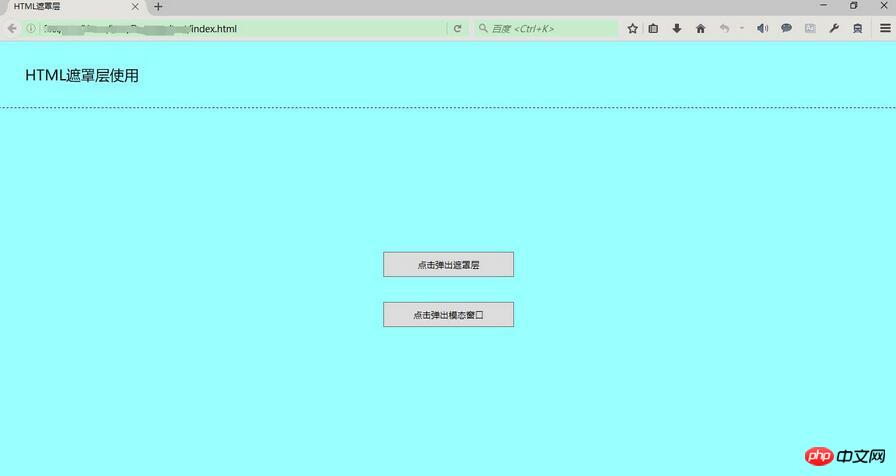
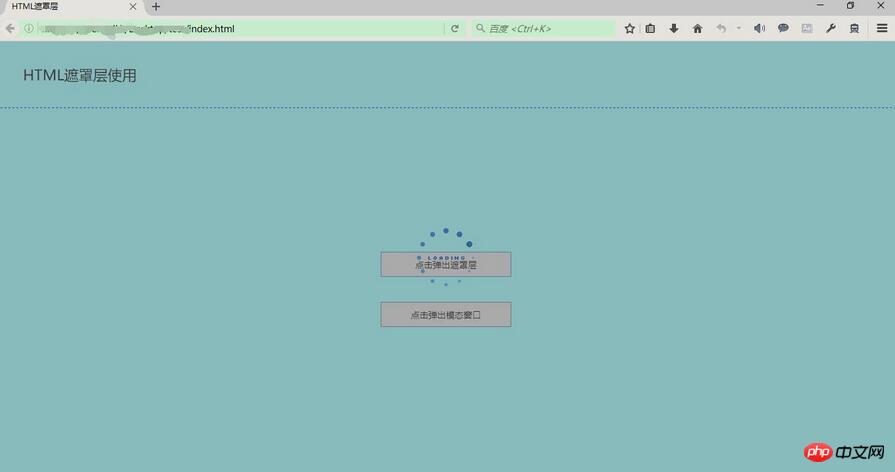
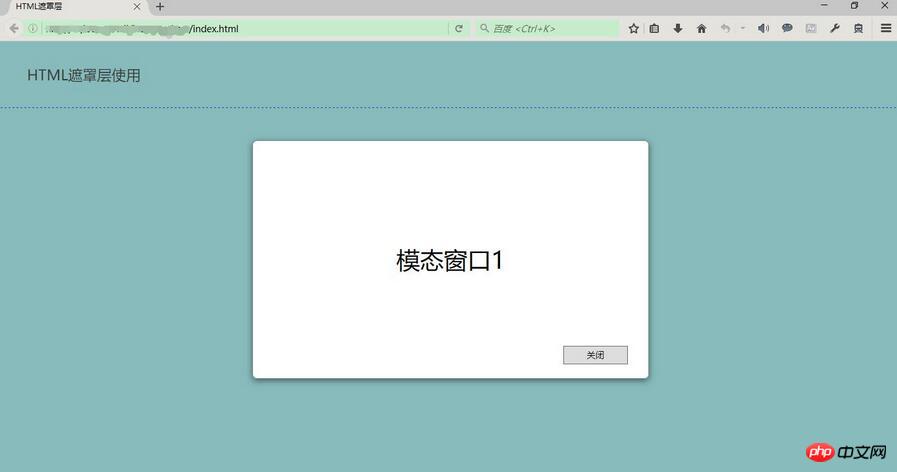
运行结果:
初始化

显示遮罩层和Loading提示

显示遮罩层和模拟弹出模态窗口

以上就是本文的全部内容,希望对大家的学习有所帮助。
相关推荐:
以上就是HTML实现遮罩层的方法 HTML中如何使用遮罩层的详细内容,更多请关注php中文网其它相关文章!
网站建设是一个广义的术语,涵盖了许多不同的技能和学科中所使用的生产和维护的网站。
推荐资讯 总人气榜
最新教程 本月人气
- 1腾讯视频会员账号分享(2017年1月4日)
- 2爱奇艺vip会员如何廉价开通?爱奇艺vip会员开通方法
- 3斗鱼TV如何屏蔽礼物?斗鱼TV屏蔽礼物图文说明教程
- 4最新腾讯视频会员账号共享(2017年1月3日)
- 5最新的腾讯视频会员账号免费共享
- 62018年12月29日腾讯视频会员账号共享
- 7腾讯视频周末影院福利开通方法说明
- 82组腾讯视频会员共享(2018.12.28)
- 9腾讯视频如何打开硬件加速?腾讯视频打开硬件加速图文说明教程
- 10腾讯视频下载管理下文在什么地方一个文件夹
- 112017年1月6日更新的腾讯视频会员账号共享账号
- 12a站如何关闭弹幕?AcFun关弹幕图文说明教程
- 1QQ影音如何截取QQ表情?QQ影音截取QQ表情图文说明教程
- 2最新爱奇艺会员账号密码大全(2017.2.20)
- 3QQ影音如何转换视频格式?
- 4qq影音如何慢放与加速?
- 5qq影音如何删除?qq影音删除图文步骤
- 6qq影音如何安装?qq影音安装图文说明教程
- 72组腾讯视频会员共享(2017.02.14)
- 8详细说明MySQL Group Replication[Multi-Primary Mode]的搭建部署过程(图文)
- 9tcl手机750多少钱 tcl750初现手机价格
- 10红米3s如何刷miui8 红米3s刷机miui8方法流程图解
- 11用钱宝如何注销 用钱宝注销图文说明教程详细说明
- 12用钱宝收不到验证码如何回事 用钱宝收不到验证码处理方法

